There are many instructions for different methods scattered throughout this Wikia. This page is a central resource, that will either tell you where in the Wikia you can find information on specfic methods (so you can apply them to your own project) or give instructions for methods not covered elsewhere.
Printing[]
Because so much of 1960' art, whether it was Pop art, Op art or Minimalism, used repetition as a major theme, print methods were HUGE. A print method means that, once your print plate is ready to go, you can print hundereds of copies, varying your colour schemes, creating patter through repetition, etc. They also provide that flat, uniform colour that mimicks that processes of commercial products — the labels of soups, mass produced photographs in magazines and so on.

Corita Kent
Printing is an excellent educational medium for kids because it is conceptually and visually tricky —they'lll learn a huge amount about the manipuation of space—and it is magical like photography. What you start with doesn't look promising ( a stupid potato or a piece of brick-coloured lino) and what emerges is...WOW. Pulling a print is like developing photographs — something out of nothing. Also, you can keep trying new prints for minimal effort, getting very different results every time.
In planning a print project, and deciding what method to use, always ask yourself: do I need a positive or a negative print method?
- A positive method results in a print in which what you drew or altered is the coloured part.
- A negative print method colours around what you have drawn/altered, leaving that part of the paper clean.
(Actually, I've never read this in art book but I assume this is what is meant by the terms! See...you get what you pay for!)
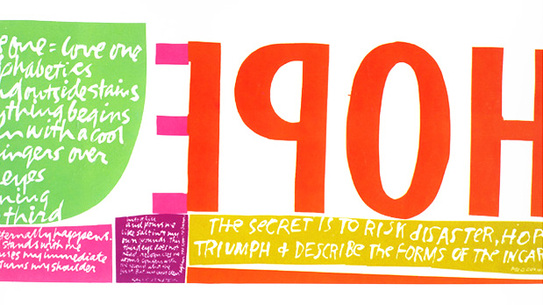
For example, the print TOP ABOVE, right hand corner, by Sister Corita Kent, uses both positive and negative printing. The large word HOPE is a probably a positive print — you could stick some foam onto board in letter shapes, ink up the letters, and there you have it. The white handwriting is a negative print. The artist has written on to the surface, and that writing is NOT inked. If you took a piece of foam and wrote on it with a pencil tip, by indenting the foam, the indented or depressed writing would not be inked, hence would leave the paper white.
Another tricky part of printing, as you will have noticed from the print ABOVE is that the print is reversed from what you draw (you flip over the print plate, and lo and behold, you have flipped over your image — who would have predicted that?!?). In the print above, Sister Corita uses this to her advantage—some of the writing is reversed, some not and that draws the eye to each part of the work in turn. Remember, if your subject is symmetrical around the vertical axis (your grade 5 child this studied this concept)—like a circlle or square or the letter X — then flipping the print plate won't make any difference. Kids should realize that reversal of the image is all part of the fun; you need to know that it occurs, and how it occurs, and then use in for your own expressive purposes. The same holds for understanding postive and negative pritn techniques.
There are many, many different ways to print, some highly technical and some very kid friendly. Some of them are below.
Print Methods[]
- Foam printing. YEAH. Foam printing is great and there are now a number of different products out there that make it so easy. The new foams take indentations very easily—you can use a pen or pencil to indent the foam or use textural elements like chicken wire, string, wooden objects, stencil blocks, etc. Some of the foam works by heating it with a hair dryer and takes very precise impression (say of a shell's surface); it can be re-used by re-heating it. Other foam had an adhesive back so that you can create a multi-coloured plate by adhering differently shaped peices to a peice of bristol board, lifting each up separately and inking it separately.
- For instructions on foam printing, see the Frank (Stella) Goes to Flin Flon and Vasarely Cooperative Canvas
- For materials, see the Resources Page.